Showing posts with label sewing. Show all posts

Wednesday, December 7, 2011

holiday crafting ideas & roundup!

 *this was originally posted this week on luvinthemommyhood but i thought those of you popping in over here on versus might like it too :)

i don't know about you guys but i'm in full on christmas crafting mode!  i thought i would give you all a hand and remind of you the fun roundups we had last season to help keep us inspired and a tad less stressed for the holidays.

wreath roundup
garland roundup
christmas stocking roundup
remember my my paper wreath?   i still have up what was my fave christmas craft from last year. i turned it from a wreath (paper leaves taped onto a cardboard base made from a pizza box...lol) into a mirror.  easy peasy and one of my fave things in our home.

paper mirror wreath
paper wreath
and just for fun....here's some fabulous tutorials from me and other fabulous guest bloggers that would make some wonderful xmas pressies for loved ones :)
1. the mallory cowl pattern 2. the carefree cowl pattern
1. infinity & beyond scarf tutorial
1. sunburst pillow  2. everest: the ultimate knitting needle organizer
1. legwarmers
1. jardain coasters  2. nesting cups
1. lace belt  2. dad's tie to gadget case  3. the buff cuff  4. organic dishcloths
to find more fun roundups to get inspiration from check out all of my link luv roundups and theme months here that include a ton of awesome guest posts for adults, babies/kids and your home. alos don't forget to head over to the headquarters of  comfy sews vs cozy knits on "versus". check out both the tutorials and the roundups there too!  lots of goodies galore to be sewn, knit or crocheted!
 
happy crafting!!!!  i'm hoping to put together another xmas roundup for you all this month...what would you like to see the most?  what is the one thing you make for xmas decor every year?

Thursday, April 28, 2011

Reversible Skirt Tutorial with Guest Disney of Ruffles and Stuff


i'm super excited to have one of the sweetest bloggers i know, disney of the blog "ruffles and stuff" join us today with a pretty cool reversible skirt tutorial! i love this tute! it's timeless, adaptable and so much fun! i'm definitely going to have to try my hand at making one of these.


disney's blog has been one of my favorites for a very long time. her photography, styling, fun personality and adorable daughter make it an irresistible place to visit.


you can find tutorials galore for ladies, little girls and for your home. you can even fancy up a pretty snazzy accessory as well! you ready to get inspired? get your fabrics ready & your machines warmed up to get working on any number of disney's tutorials.


now let's hear from disney...


Oh! I'm so excited to be part of Versus, I don't even know what to do with myself. What an honor! Thank you, Shannon!

And I'm extra-excited to be in sewing's corner of the ring. Sewing is such an open field for creativity. I don't want to make the knitting ladies feel bad, knitting is so lovely, and you can make some very lovely things. But, seriously, with sewing, what can't you do? If the choice comes between the two, for me, it's sewing-hands down.

And to help state my case, here's a lovely little sewing tutorial from me to you!

A reversible skirt.

One skirt, two looks! With simple, beginner-type directions.


All the benefits of two distinct skirts, with the effort of only one! Hot dog!

Got a split personality? No problem. Let both sides shine!

One side of mine (I call her Poppy) loves little country florals, picket fences and wearing rain boots whenever possible.


The other half of me likes to plays it pretty safe. All matchy-matchy and "normal" looking.


But, if you flip your skirt, won't one side have a seam showing?

We can't have that....


And what about where the elastic is closed?


It's no problem! Let's see how it's done...

1. First we'll need a nice elastic waistband for our skirt. Wrap some 2"-3" elastic around your waist until it's comfortable, add an inch and sew ends together, leaving about an inch on one end. (Photo a) Then fold the extra bit over twice, open up the waistband and sew the folded bit down. (Photo b)


2. Next cut two lengths of fabric for your skirt pieces. 2x your widest hip/waist measurement and 28" long for your main fabric, 18" for your accent fabric.

3. Turn each piece into a tube by sewing the sides together with right sides facing. Hem the bottom of the 18" piece.


4. To hem the longer piece, turn under the edge once and fold up the bottom about 7", pin well. Then use chalk or a sewing pen to mark 1" lines all the way up. Sew along each line with matching thread.


5. You'll need to gather the top of each skirt piece slightly until it's a little larger than your elastic band. To gather, sew along the top with a long straight stitch and pull one of the threads as you slide the fabric down.

6.Then pin the elastic band to the top of the skirt pieces in four equally spaces places. As you can see in the photo, the right sides of the skirt pieces should be facing each other, with elastic sandwiched in between, and all layers flush on top.

6. Gently stretch the elastic band as you sew the three layers together with a zigzag stitch.


All done!

Now you can have fun thinking of fun color combinations. :o)

But be sure that neither of your fabric choices show through to the other side.

And if you want to practice a little before making your own, this pattern works for little punkin's, too!


I hope you enjoyed the tutorial!

Thank you again so much for having me Shannon.

Have a wonderful day, everyone!! :O)

Love,

Disney

thanks so much for being part of comfy sews VS cozy knits disney! love this skirt! remember what i told you...i will email you daily..wink wink :P if you all want to see more of disney's work pop on over to her fab blog - ruffles and stuff.

are you planning on making this skirt? don't you just love the fact that it's reversible too? so fun!

Wednesday, April 27, 2011

Spring Wrap Belt & Bracelet Tutorial with Guest Sascha of Piccoli Piselli


our next talented guest is sascha from the wonderful blog piccoli piselli. i fell in love with sacha's blog at first site sometime last summer. her style, taste, sewing skills and gorgeous photos just lured me in. piccoli piselli is a pretty and inspiring place to go visit. i knew when i decided to do a spring/summer version of comfy sews VS cozy knits that i had to ask sascha. i'm so happy she said yes :)


sascha has some great sewing tips and tutorials on her blog. she's also pretty handy with some diy. you can also purchase some of her lovely handmade goods in her shop as well. she makes some pretty darn stylish baby carriers if you ask me :)


she's also the talented lady behind the "lego play table" from this year's session of "celebrate the boy".


you can always tell when sascha's made something. she always leaves a little piece of her style on her garments. her fabric pairings are fun with a touch of whimsy. i also love that she loves sewing with knits so much and makes it look super easy to do. she's always inspiring me to get the knits out...and add just that "little extra something special" to a handmade garment.


now let's hear from sascha...

Hello everyone from the Mommyhood! I'm Sascha from Piccoli Piselli. I'm so excited to be a part of such an amazing group of bloggers. I also want to say thanks to Shannon for asking me to jump into the Versus ring. I was thrilled when she asked me to contribute.

I'm here to show something for the Comfy Sews side of things. It's no secret that I like sewing with knits. I'm usually creating clothes for my kids and for some reason I find it hard to sit down and make something for myself. I'm also usually dressed the same way every day. A white t-shirt and jeans. I'm not kidding about everyday. So I decided to create something that could spruce up my daily uniform without going too far out of my comfort zone. There's no denying how cozy knit fabric is to wear. For those of you new to sewing with knits or nervous about trying it out, this is the perfect project for you.

With this tutorial you can also make...

This project is super easy and what's best is that I used scraps to create everything.

For the main belt/bracelet you'll need knit fabric. I used a cotton/rayon jersey knit. How much depends on the finished length you want. The embellishments can be cotton, chiffon, lace, rayon, buttons, beads, feathers... well just about anything. Some other things for this projects are a rotary cutter, fabric loop turner and a sewing machine or serger. I'll be using a serger to create the long strips in this tutorial.

So let's get started

I like to have a belt made with between 2-3 lengths of knit fabric sewn together. Since most knits are pretty wide this gives you a lot of length. Old t-shirts are great for making a bracelet. The green belt is a finished length of about 170". I used less than 1/4 yard. The best way to cut the knit strips is to fold your fabric in either quarters or thirds so that when you cut the strips you will be cutting through multiple layers. I found that 1 1/4" width worked for my fabric loop turner.

With right sides together stitch your strips together at the short ends. Trim seam allowance.

If using a serger (recommended) make sure to leave a tail of thread for the next step. With right sides together stitch the strip closed creating a long tube. If you are using a sewing machine for this you will want to stitch your loop closed with a zig-zag. Not too narrow but not too wide. When you turn the loop right side out the fabric stretches a lot and the threads can break if you are not careful.

This is what your belt will look like before it's turned right side out.

A little bit about fabric loop turners. I own two different kind of loop turners. As you can see above I prefer the loop turner pictured on the left. The metal turner will work for shorter loops, but I haven't tried it on a super long belt. The blue turner actually comes in a two pack and this is the skinnier of the two. I love this turner and I use it on a lot of projects.

Here's where the tail of thread you left comes in to play. On my loop turner there is a tab of plastic that you can wrap the thread around. The chain stitch from the serger should be strong enough to withstand the pulling you are about to put it through. I did have the thread break halfway through turning on one of my samples so don't pull too hard. It can be tricky to get the loop started but once you get the fabric started turning right side out it's just a lot of mindless pulling and stretching and tweaking. I'm not going to lie. This can get tedious. I took my 170" belt and watched t.v. It took about an hour. I imagine if you make your belt a little wider the loop will turn easier, but I think it looks cute with the spaghetti strap look.

Once it is turned you can lightly press it, but I didn't feel the need. Set aside.

Next is making the embellishments. To make the tail of the belt I took a scrap strip of chiffon that measured about 2 1/2"-3" wide by 25". I didn't cut the edges. I ripped the strip so the edges would fray. Stitching with a gather stitch (on my machine 5.0), stitch two rows or stitching side by side down the center. I only stitched one row in this photo but I used heavy duty thread. Since this piece once gathered will have no other stitching, you'll want to have either strong thread that won't break easily or the two rows of stitching. Gather to the length you want and tie the ends of the thread. I made a small back and forth stitch on one end of this tail.

I hand stitched the tail onto one end of my belt so I could tuck in the raw edges of the chiffon. The other end of the belt I just tied a knot and cut the fabric close to the knot.

Now for the fabric flowers. Yes, I know they are all over the place. I also realize I'm probably hitting the tail end of the trend, but what can I say? They're easy to make and really very pretty. There are a bajillion (I swear it's a word) different tutorials out there on different flowers to be made from fabric so I'm not going to try and re-invent the wheel. Actually, that's not my intention with any of my tutorials. People have been sewing and creating long before I met the internet.

After looking around the interweb I decided to try both sewn and glued flowers. I can't really say I have a preference. I didn't use hot glue, but a flexible fabric glue that had to dry over night. I played around with shapes and fabric scrap widths, and it got kind of addictive. That's actually what led me to create the bracelet.

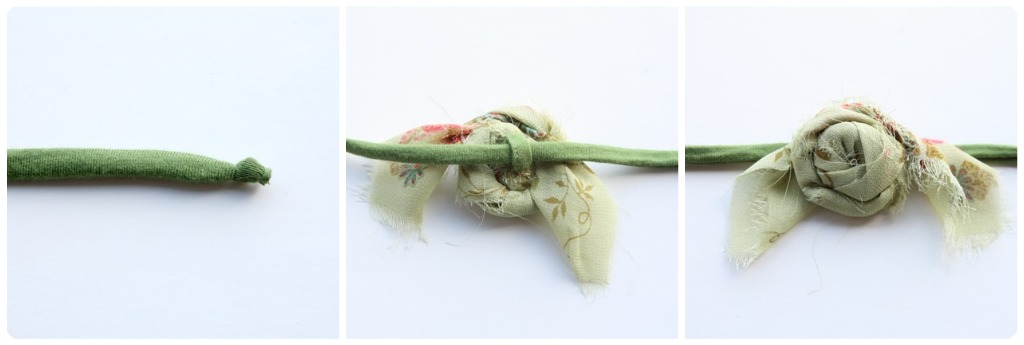
I also tried two different ways for attaching the rosettes. On the green belt I wanted to be able to move the flower around depending on where the tie ended up. I made a small loop that I hand stitched on to the backs of the flowers.

It was an extra step but it worked out nicely.

On this belt I stitched them in place. I tried the belt on and marked where the flower placement should go and I just back-tacked a few times.

Here I am wearing the belt. I made this one shorter with only two lengths of knit fabric.

Here is another bracelet I made. The bracelet is a really quick project and before you know it you can have something to go with just about any outfit.

In case you are wondering how to tie the bracelet without the help of a third hand, it's really quite easy. Just hold one end in the same hand of the wrist you are wearing your bracelet. With the opposite hand start winding fabric around your wrist. Tie a loose knot and you're done!

I hope you enjoyed this tutorial and thanks for reading until the end.

thanks so much for joining in sascha! it's been so fun chatting with you :) you guys can find more piccoli piselli here:

*blog *shop

these are so adorable! i can't wait to give them a try! what color/flower combo would you make yours in?


Related Posts Plugin for WordPress, Blogger...