

our next talented guest is sascha from the wonderful blog piccoli piselli. i fell in love with sacha's blog at first site sometime last summer. her style, taste, sewing skills and gorgeous photos just lured me in. piccoli piselli is a pretty and inspiring place to go visit. i knew when i decided to do a spring/summer version of comfy sews VS cozy knits that i had to ask sascha. i'm so happy she said yes :)


Hello everyone from the Mommyhood! I'm Sascha from Piccoli Piselli. I'm so excited to be a part of such an amazing group of bloggers. I also want to say thanks to Shannon for asking me to jump into the Versus ring. I was thrilled when she asked me to contribute.
I'm here to show something for the Comfy Sews side of things. It's no secret that I like sewing with knits. I'm usually creating clothes for my kids and for some reason I find it hard to sit down and make something for myself. I'm also usually dressed the same way every day. A white t-shirt and jeans. I'm not kidding about everyday. So I decided to create something that could spruce up my daily uniform without going too far out of my comfort zone. There's no denying how cozy knit fabric is to wear. For those of you new to sewing with knits or nervous about trying it out, this is the perfect project for you.
With this tutorial you can also make...

This project is super easy and what's best is that I used scraps to create everything.
For the main belt/bracelet you'll need knit fabric. I used a cotton/rayon jersey knit. How much depends on the finished length you want. The embellishments can be cotton, chiffon, lace, rayon, buttons, beads, feathers... well just about anything. Some other things for this projects are a rotary cutter, fabric loop turner and a sewing machine or serger. I'll be using a serger to create the long strips in this tutorial.
So let's get started

I like to have a belt made with between 2-3 lengths of knit fabric sewn together. Since most knits are pretty wide this gives you a lot of length. Old t-shirts are great for making a bracelet. The green belt is a finished length of about 170". I used less than 1/4 yard. The best way to cut the knit strips is to fold your fabric in either quarters or thirds so that when you cut the strips you will be cutting through multiple layers. I found that 1 1/4" width worked for my fabric loop turner.

With right sides together stitch your strips together at the short ends. Trim seam allowance.

If using a serger (recommended) make sure to leave a tail of thread for the next step. With right sides together stitch the strip closed creating a long tube. If you are using a sewing machine for this you will want to stitch your loop closed with a zig-zag. Not too narrow but not too wide. When you turn the loop right side out the fabric stretches a lot and the threads can break if you are not careful.

This is what your belt will look like before it's turned right side out.

A little bit about fabric loop turners. I own two different kind of loop turners. As you can see above I prefer the loop turner pictured on the left. The metal turner will work for shorter loops, but I haven't tried it on a super long belt. The blue turner actually comes in a two pack and this is the skinnier of the two. I love this turner and I use it on a lot of projects.

Here's where the tail of thread you left comes in to play. On my loop turner there is a tab of plastic that you can wrap the thread around. The chain stitch from the serger should be strong enough to withstand the pulling you are about to put it through. I did have the thread break halfway through turning on one of my samples so don't pull too hard. It can be tricky to get the loop started but once you get the fabric started turning right side out it's just a lot of mindless pulling and stretching and tweaking. I'm not going to lie. This can get tedious. I took my 170" belt and watched t.v. It took about an hour. I imagine if you make your belt a little wider the loop will turn easier, but I think it looks cute with the spaghetti strap look.
Once it is turned you can lightly press it, but I didn't feel the need. Set aside.

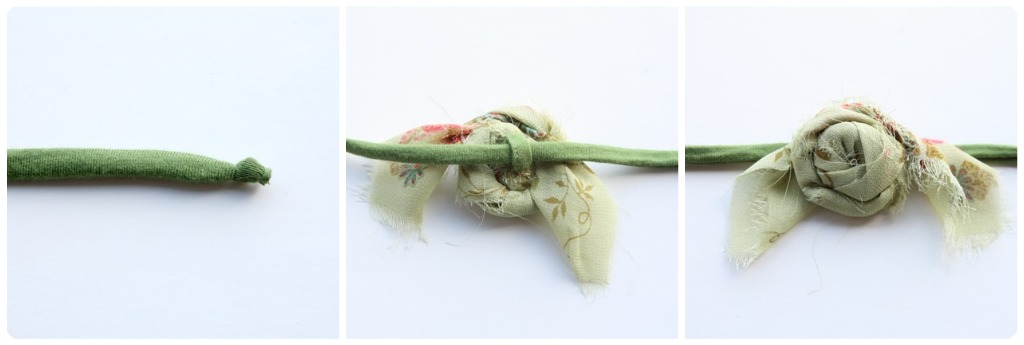
Next is making the embellishments. To make the tail of the belt I took a scrap strip of chiffon that measured about 2 1/2"-3" wide by 25". I didn't cut the edges. I ripped the strip so the edges would fray. Stitching with a gather stitch (on my machine 5.0), stitch two rows or stitching side by side down the center. I only stitched one row in this photo but I used heavy duty thread. Since this piece once gathered will have no other stitching, you'll want to have either strong thread that won't break easily or the two rows of stitching. Gather to the length you want and tie the ends of the thread. I made a small back and forth stitch on one end of this tail.

I hand stitched the tail onto one end of my belt so I could tuck in the raw edges of the chiffon. The other end of the belt I just tied a knot and cut the fabric close to the knot.
Now for the fabric flowers. Yes, I know they are all over the place. I also realize I'm probably hitting the tail end of the trend, but what can I say? They're easy to make and really very pretty. There are a bajillion (I swear it's a word) different tutorials out there on different flowers to be made from fabric so I'm not going to try and re-invent the wheel. Actually, that's not my intention with any of my tutorials. People have been sewing and creating long before I met the internet.

After looking around the interweb I decided to try both sewn and glued flowers. I can't really say I have a preference. I didn't use hot glue, but a flexible fabric glue that had to dry over night. I played around with shapes and fabric scrap widths, and it got kind of addictive. That's actually what led me to create the bracelet.

I also tried two different ways for attaching the rosettes. On the green belt I wanted to be able to move the flower around depending on where the tie ended up. I made a small loop that I hand stitched on to the backs of the flowers.
It was an extra step but it worked out nicely.

On this belt I stitched them in place. I tried the belt on and marked where the flower placement should go and I just back-tacked a few times.

Here I am wearing the belt. I made this one shorter with only two lengths of knit fabric.

Here is another bracelet I made. The bracelet is a really quick project and before you know it you can have something to go with just about any outfit.

In case you are wondering how to tie the bracelet without the help of a third hand, it's really quite easy. Just hold one end in the same hand of the wrist you are wearing your bracelet. With the opposite hand start winding fabric around your wrist. Tie a loose knot and you're done!
I hope you enjoyed this tutorial and thanks for reading until the end.
thanks so much for joining in sascha! it's been so fun chatting with you :) you guys can find more piccoli piselli here:
these are so adorable! i can't wait to give them a try! what color/flower combo would you make yours in?
Oh wow, I love this. Definitely going to give it a go!! I definitely love the springy green, but could see this in tons of colours - I have a whole stash of knit scraps from making my daughter's "rainbow dress that twirls" so I am DEFINITELY seeing a few of these in my future - thank you for the tutorial!!
ReplyDeleteThis is so beautiful!! I linked to your tutorial on Craft Gossip Sewing:
ReplyDeletehttp://sewing.craftgossip.com/tutorial-spring-wrap-belt-bracelet/2011/04/27/
--Anne
Sascha, you thought of everything...even down to how to tie it with one hand! Great tutorial!
ReplyDelete