
 ohhhhhh, i love me a good pillow! i especially love me a pillow when it's anna of the addictive & oh, so inspiring blog noodlehead. anna is a pillow addict, a kick ass sewer, a busy mom, and another one of my fave bloggy pals.
 here's an example of what is usually a regular email from me to anna:
 Hi anna, You are ahhhmmmmaaaaaaazing!!!!!!!!!!!! Love it!!!!!!!!!
blah blah blah blah...blubbery blah.....ahhhhhmazing!!!!!!! blah blah blah...love.....blah blah blah...so amazing!!!
blah blah blah blah...blubbery blah.....ahhhhhmazing!!!!!!! blah blah blah...love.....blah blah blah...so amazing!!!


so let's all get ready to add some sunburst style to our comfy homes! here's anna...

Hey there luvinthemommyhooders! It's me Anna, from noodlehead. So glad Shannon asked me to join in today in the Comfy Sews vs. Cozy Knits battle. Even though I've been lured into the Cozy Knits side, I haven't taken time to learn how to knit or crochet yet, so for me I'm with the Comfy Sews!
How about a Comfy Sew for your home? Maybe something for on a chair, your couch, or your bed? Well, today I want to show you a really fun pillow to make. It's made of really soft and pretty linen with a sunburst of pintucks! Simple and elegant and modern.

Materials:
1/2 yard linen (or any solid color fabric would really look stunning as well), you may need up to 1 yard depending on what size pillow form you use
one pillow form 14x20 - the one I'm using is actually from Target, it's a travel pillow (you'll find them right next to the regular bed pillows, the best part is that they're under $5)
thread, pins, etc.

Cutting the pieces:

- main front piece 20" wide by 16" tall (this is cut a little tall for the pillow form, but it's to leave room for the pin tucks)
- envelope back closure pieces: 14" tall by 16" wide, 14" tall by 12" wide
Measurements for a king size pillow 20" tall by 36" wide: front (36" wide by 22" tall, cutting down to 36" wide by 20" tall), back closure pieces 20" tall by 26" wide, 20" tall by 14" wide.
Also, I thought I should add that the smaller you cut your pillow sizes the firmer fit on the pillow form. I usually like a really snug and tight fit, so I often cut my pieces smaller than the pillow form just to get that nice tailored look.
*** I just want to note here that the photos I've taken for this tutorial are from making a king size pillow cover, but the technique is the same no matter what size pillow form you use.
Making the sunburst pin tucks:
Using the edge stitching foot on your machine (or even your regular sewing foot - you'll just have to be a little more precise) sew the pin tucks.

Take the pillow main front piece and make an angled fold in the fabric, WRONG sides together. Press.

Stitch fairly close to the fold. This is where the edge stitching foot comes in really handy.

See that little metal piece sticking down from the middle? That'll be where you hold the fold up next to, and it'll give you a really nice straight pintuck without worry about wobbles.

Again, if you don't have a machine with that foot, a regular foot will work just fine, just try and make your stitches as straight as you can. Press pin tuck towards the top. Repeat pin tucks by making radiating lines from one side of the pillow (you choose which side - no need to be technical here).
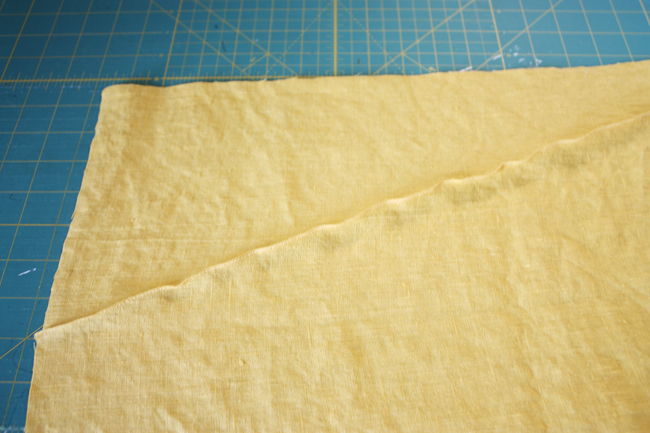
(this seam looks wobbly here, but it's just the nature of the linen, once it's pressed it lays flat and smooth)
Just keep making angled folds to guide where your pin tucks will be (I did 5 pin tucks per pillow), don't worry about placing them in an exact place, it's meant to be more abstract. If you're not comfortable doing that, just use a water soluble pen to mark the lines where you'll be folding (just be sure that your water soluble pen still comes out once you've ironed over it). Trim the pillow top down so it measures 20" wide by 14" tall.

Making the pillow back:
Feel free here to use whatever pillow closure method you prefer. I really love a good invisible zipper on a pillow, if you want to try one out, I highly recommend Sew Katie Did's Invisible Zipper Tutorial. The easiest and quickest method (and the one I'm showing you here) is an envelope style closure, easy to sew and pops off quickly for washing.


Take one envelope back piece and press one 14" side over to the WRONG side by 1/2", repeat. Stitch close to the fold. Repeat for remaining envelope back piece.
Assembling the pillow:

Lay your pillow top RIGHT side up on your table. Place the wider envelope back piece RIGHT side down on top, aligning the raw edges and having the hemmed edge facing the middle. Next, lay the remaining envelope back piece RIGHT side down, aligning the raw edges. Pin.

Sew around entire rectangle using a 1/2" seam allowance.

Serge, zig-zag stitch or leave edges raw. Clip corners. Press again, insert pillow form and you're set.
This also could easily be sized up or down to fit the pillow form of your choice. Now go sew some comfy stuff!
Thanks again Shannon for having me over to duke it out! Be sure to stay tuned to Luvinthemommyhood for lots more of Comfy Sews vs. Cozy Knits!
Terms of use: For personal use only please.
you can find more of anna on her blog noodlhead and for more eye candy check out her flickr page!
thanks so much anna! i'm thrilled to have you back again for comfy sews VS cozy knits hun! what do you guys think? are you a pillow addict too? what's your favorite pillow pattern to sew? do you use an invisible zipper method or envelope style?


Everything Anna does is always gorgeous. I am impressed, as always! And have I mentioned I love your versus series yet...umm, yeah - LOVE IT!
ReplyDeleteThanks Jessica! so glad you are loving it! I'm having lots of fun with it!
ReplyDeletethose serged edges are perfect!!! i need me a serger :) mothers day where are u:)
ReplyDeletethis would be the perfect pillow for my sons room - an accent to the moon - moonbeams :)
@sueI never thought of it that way until you pointed that out. That would be perfect for a boy's room! Such a great idea Sue!
ReplyDeleteThat is perfection. I've been meaning to recover an old pillow for my bench in my bedroom. Never knew how to do a pin-tuck before. Thanks!
ReplyDeleteAnna rocks it out once again! Love this!
ReplyDeleteHi there! I love this idea...it's so darling...and I was hoping that you might add it to my Easter and Spring Linking Party to share with my readers. If you are interested, you can go here http://bakedbyjoanna.blogspot.com/2011/04/easter-linking-party.html to enter. Thanks!
ReplyDeleteFantastic tutorial! Thanks!
ReplyDeleteThis tutorial is amazing! I just got done trying out applique for the first time on a pillow (www.decoratingdiy.blogspot.com/2011/04/appliqued-bird-pillow.html) and am itching for another pillow to add more texture. This is perfect!
ReplyDeleteThanks,
Kristen
Turning a House into a Home
Oh, and PS I'm your newest follower!
ReplyDeleteKristen
Beautiful!
ReplyDeleteStunning! -Marci @ Stone Cottage Adventures
ReplyDelete