
 we've got a new look here in the mommyhood - you likey? i looooove it! things are still in progress though so bear with me the next few days as all gets finalized. i can't think of a better person though to kick off our new look with than the lovely, sweet, kind and oh, so talented jessica of the blog "happy together".


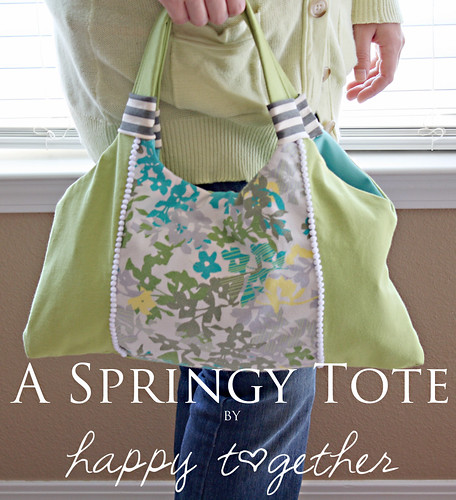
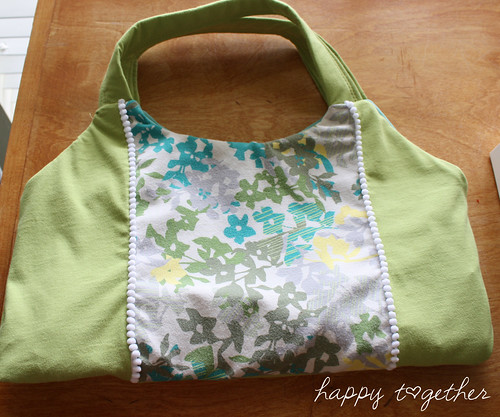
Knits are so much fun with so many possibilities!!!!!! I decided to make a little tote for this event. It's lightweight and very washable and environmentally friendly if you upcycle some shirts. Perfect for the spring and summer time! Here is what you will need to make one yourself:
-Paper, pencil, and ruler for creating the pattern
-About 3-4 t-shirts if upcycling
-4 pieces of knit fabric that are 6" x 4" for strap covers
-34 inches of trim or piping for the front (I added a little extra just to be cautious)
-1 yard of lightweight or mediumweight interfacing
-Magnetic purse closure
-Two small pieces of felt
-Fabric Glue
*Before we get started, remember that you have a ball point needle in your machine for sewing knits. This makes a world of difference. Also, it helps to do a few practice stitches to make sure the stitch length works for that type of fabric. Oh, one more thing, I highly recommend using a spray starch and ironing before cutting.
*All seams are 1/4"
Let's begin by creating a pattern. Feel free to change any measurements as you like :)
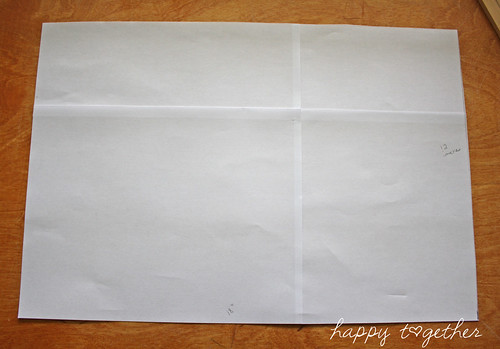
1. Start with a square piece of paper measuring 12" tall by 18" wide.
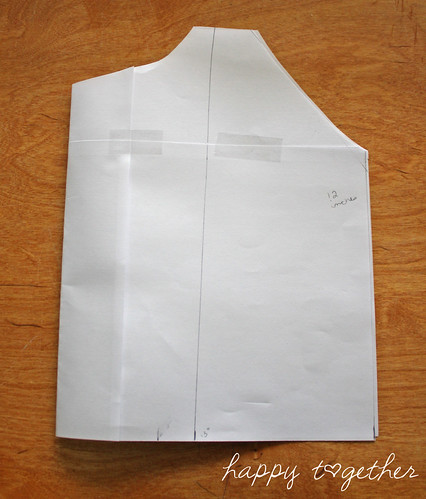
2. Fold in half width-wise. Cut an angle on the center crease to be the middle of the purse and cut an angle on the open end to be the side.

3. Open it up. I suggest going ahead and using this piece to cut out a few pieces:
-1 piece for the back
-2 pieces for the inside lining
-2 pieces of interfacing
-1 piece for the back
-2 pieces for the inside lining
-2 pieces of interfacing
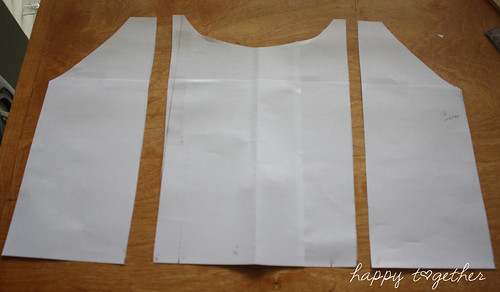
4. Then to create the front pieces, measure on the bottom to the 8" mark and the 13" mark. Draw a vertical line from those points and cut the paper there. Make sure to add seam allowance to the places where you cut the paper when cutting the fabric. So now use these pieces to cut out:
-1 of each side piece for the front of the purse
-1 center piece (I suggest a bold pattern to show off here)
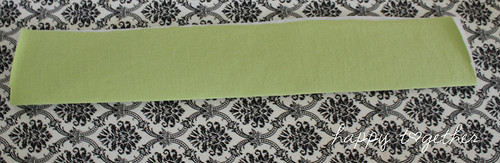
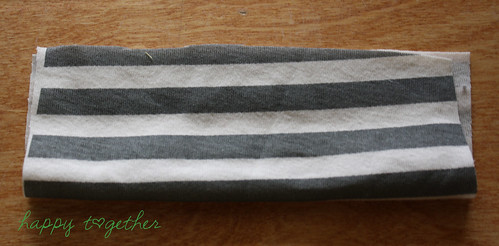
5. Now, cut out two straps from knit fabric that measure 15" x 4" and two pieces of interfacing that are the same size.
6. Cut out any fabric for inside pockets if you like. I just cut of the sleeves of a shirt and made them into rectangular pieces. Then I didn't have to stitch up the top of the pocket because it was already done.
-1 of each side piece for the front of the purse
-1 center piece (I suggest a bold pattern to show off here)
5. Now, cut out two straps from knit fabric that measure 15" x 4" and two pieces of interfacing that are the same size.
6. Cut out any fabric for inside pockets if you like. I just cut of the sleeves of a shirt and made them into rectangular pieces. Then I didn't have to stitch up the top of the pocket because it was already done.
You should now have all of these pieces below:
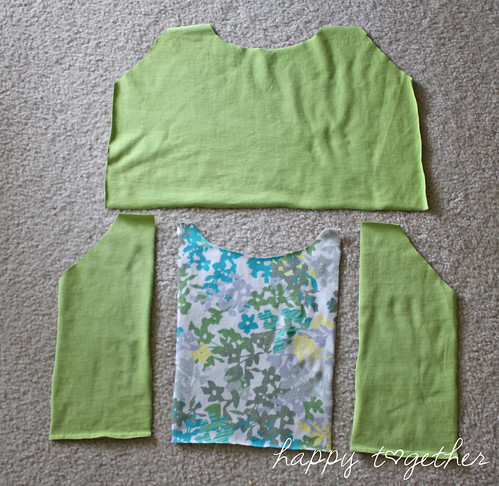

The Front The Inside, Straps, and Pockets
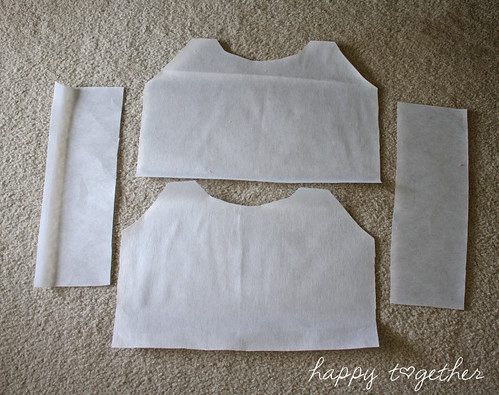
The Interfacing
Let's start sewing with the straps.
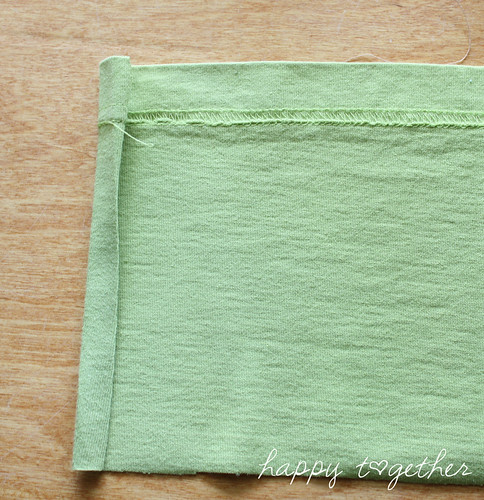
7. Place one of the strap pieces right side down. Then place a piece on interfacing on top. Fold in half and iron.
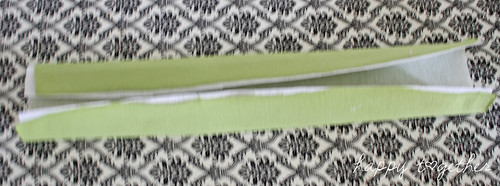
8. Open up and fold each long side to the center crease you just made. Then iron.
9. Refold to the center crease and iron. Sew down the open side.
10. Repeat for other strap.
10. Repeat for other strap.
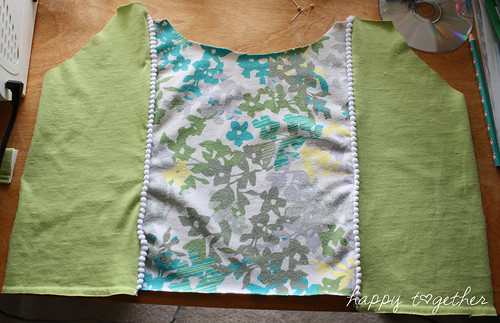
11. Cut your trim or piping in half and sew onto the front middle piece edges. Make sure the side of the trim you want to be unseen is facing the outer edge.
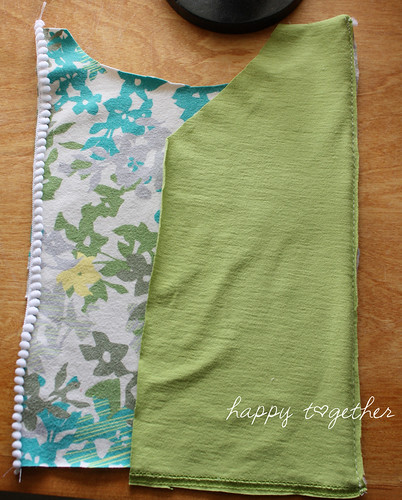
12. Take one of the side pieces and lay on top, right sides facing. Sew together.
13. Repeat for the other front side.
13. Repeat for the other front side.
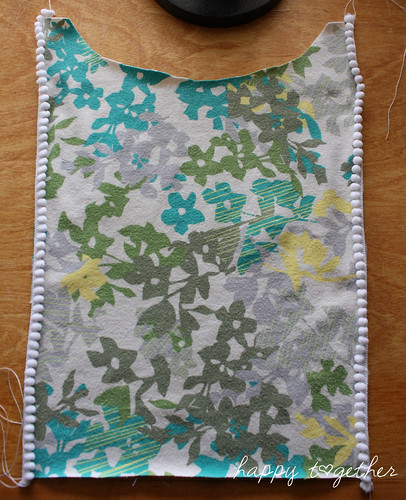
14. If you have any pocket pieces, fold over the side edges towards the wrong side of the fabric. Then fold over one more time. Repeat for both sides. Fold up the bottom edge once. (I didn't have to mess with the top because it was already finished).

15. Place a piece of interfacing down with an inside piece on top, facing right side up. Pin the pockets where you would like them to go.
16. Sew them in place along the side and bottom edges. You can sew other vertical lines to create smaller pockets for placing things.
16. Sew them in place along the side and bottom edges. You can sew other vertical lines to create smaller pockets for placing things.
17. Take the front piece and lay it down, right side facing up.
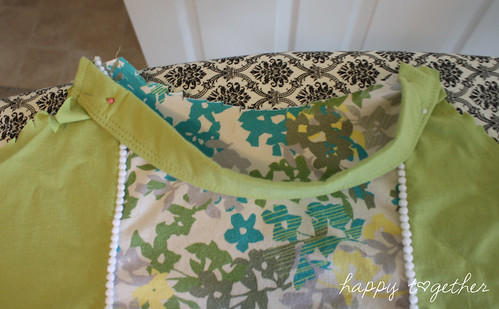
18. Take a strap and pin it to the middle top points.
19. Take one of the inside pieces and place it right side facing down. Then place the interfacing piece on top if it wasn't sewn on with the pocket piece. Pin together and sew along the yellow line.
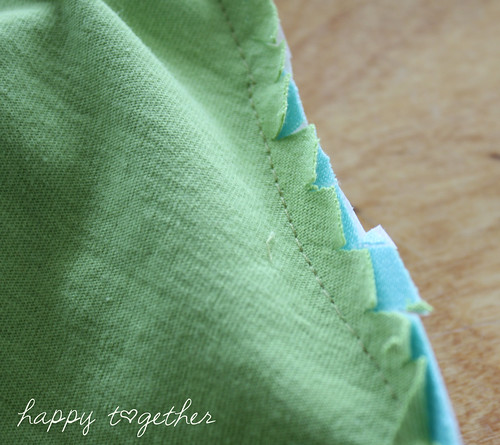
20. Clip inward at the curved edges for a smoother finish.
21. Repeat these steps for the other two sides of the tote.
21. Repeat these steps for the other two sides of the tote.

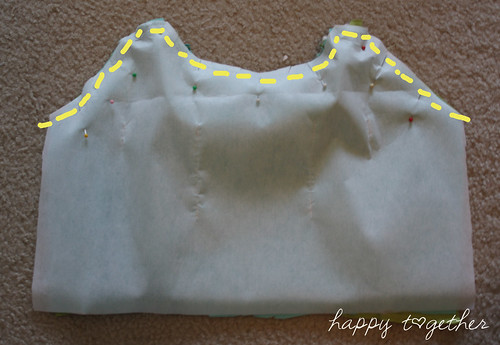
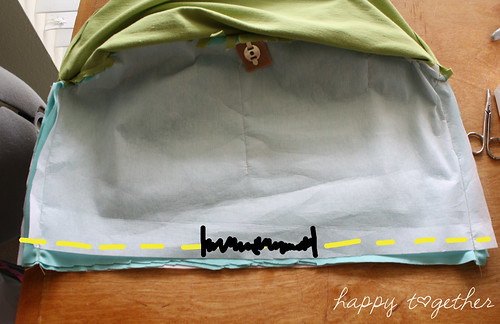
22. Open up each side of the bag and place together right sides facing. Make sure to line up middle seams with each other. Sew around the yellow lines, leaving only the inside bottom unsewn.
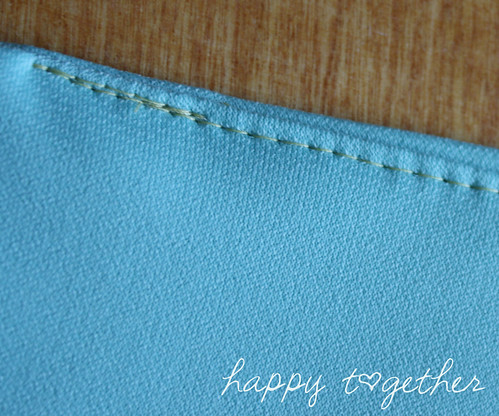
23. Turn right side out and iron around the top.
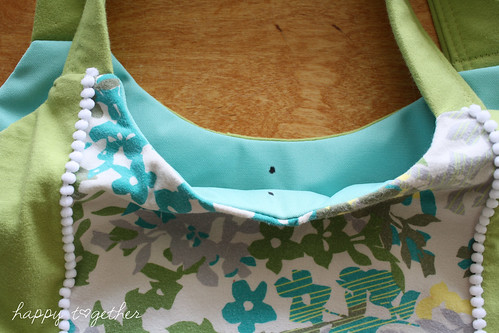
24. Then mark the middle of the top inside where you want the magnetic closure to go.

25. Cut a big enough slit for the piece to go through on each side. Make sure to only cut through the inside and interfacing only!
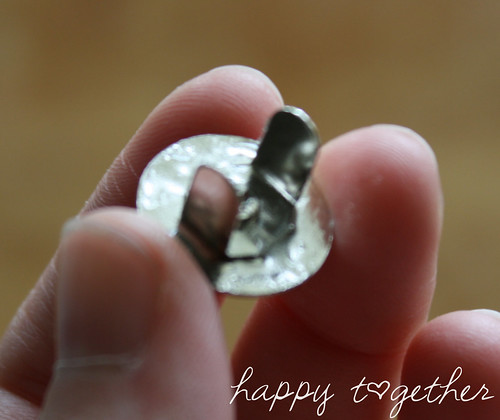
26. Take one of the main pieces of the magnetic closure and put fabric glue on the bottom.
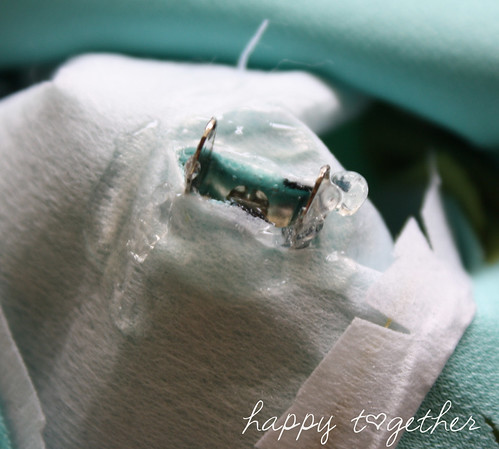
27. Stick it through the slit and it will look like this. Add some more fabric glue on top.
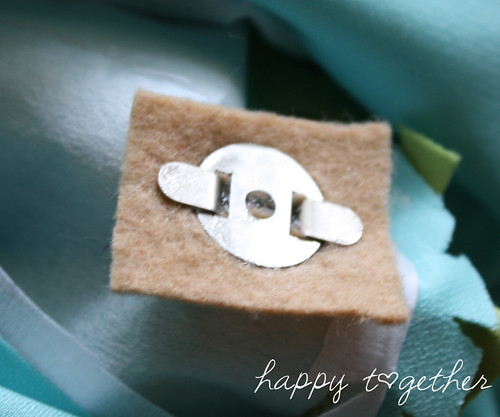
28. Then cut two small pieces of felt and cut a slit in them. Put one on top and then add the final piece of the closure. Push the prongs down.
29. Repeat for magnetic closure on the other side.
29. Repeat for magnetic closure on the other side.
30. Turn wrong side out and sew across the inside bottom, except for a few inches in the middle for turning.
31. Turn right side out. Then turn the raw edges of the opening inward and sew shut.
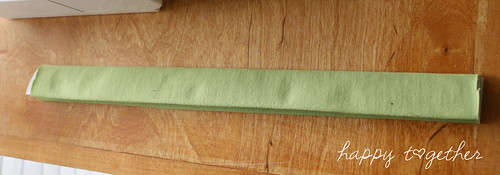
32. Take your 4 pieces that are for the strap covers.
33. Fold in half, wrong side facing, and sew long ends together.

34. Fold it so the seam is in the middle of the piece now.
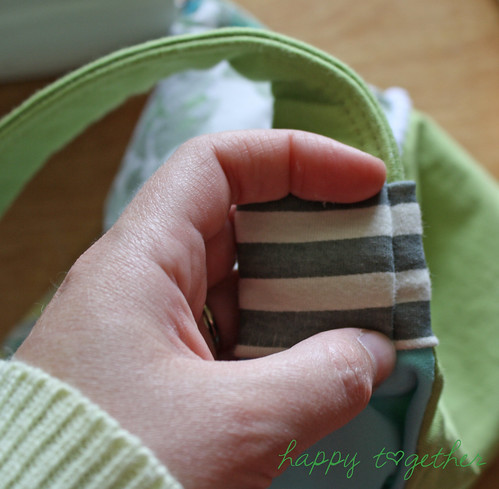
35. Fold around each strap with the seam facing the strap so it can't be seen. Tuck the edge that is on top under and sew in place (I also made sure this edge was facing the inside of the purse). Or you could be lazy like me and just fabric glue these pieces in place :) Just as good!

And that's all for now!!!! Thanks Shannon for having me :) It's been a pleasure as always. GO COMFY SEWS!!!!!!!!!
thank you sooo much for joining in jessica! you're the best and i loooooove this tote! so fun! i'm so glad you could join in on all the fun! hugs! you can find more jessica here:
*blog *facebook *etsy *twitter *flickr
have you all been in the mood to whip up a new spring tote? what fabrics or colors would you use to make this? share, share! we wanna see pics and have a chat! happy monday!
Love the bag:) and her blog:) I do need a new bag... Hmm...
ReplyDeleteHugs to you! Have a happy Monday:)
Awesome bag!! I linked to your tutorial on Craft Gossip Sewing:
ReplyDeletehttp://sewing.craftgossip.com/tutorial-make-yourself-a-springy-tote-bag/2011/05/01/
--Anne
Love the bag, and thanks for the tutorial. GREAT JOB.
ReplyDelete